Composting for Beginners
Updated June 2026
Turn kitchen scraps and garden waste into the best soil amendment your garden will ever get
Composting is the process of turning organic waste into a dark, crumbly, nutrient-rich material that feeds your soil and your plants. It happens naturally in every forest, every paddock, and every patch of ground where leaves fall and decay. All you are doing is speeding up that process and capturing the result for your garden.
A good compost bin is the single most useful addition to any garden. It reduces household waste going to landfill, saves money on fertilisers and soil amendments, and produces something that no commercial product can match. Finished compost is alive with beneficial microorganisms that improve soil structure, water retention, and nutrient availability in ways that synthetic fertilisers cannot.
You do not need special equipment or expertise. A pile of organic material in a corner of your yard will break down on its own. But understanding a few basics will help you make better compost, faster, with fewer problems.
Hot Composting vs Cold Composting
There are two main approaches to composting. Both produce the same end result. The difference is speed and effort.
Hot composting
Hot composting is the faster method. You build the pile all at once with the right mix of materials, and it heats up to 55 to 65 degrees Celsius within days. At those temperatures, weed seeds, pathogens, and plant diseases are killed. You turn the pile every 3 to 5 days to maintain oxygen and even heating. A well-managed hot compost pile produces finished compost in 6 to 8 weeks.
Hot composting requires:
- Enough material to build a pile at least 1 cubic metre in volume (about the size of a washing machine)
- The correct carbon-to-nitrogen ratio (more on that below)
- Regular turning (every 3 to 5 days)
- Consistent moisture (like a wrung-out sponge)
Cold composting
Cold composting is the lazy method, and there is nothing wrong with that. You add materials to the pile whenever you have them. Kitchen scraps go on top. Garden prunings get tossed in. You turn it occasionally (once a month or less) or not at all. The pile breaks down slowly at ambient temperature over 6 to 12 months.
Cold composting is better for people who:
- Do not generate enough material to build a full pile at once
- Do not want to turn the pile regularly
- Are happy to wait longer for the finished product
- Just want to divert waste from landfill
The trade-off is that cold composting does not reach temperatures high enough to kill weed seeds or plant diseases. Avoid adding weeds that have gone to seed or diseased plant material to a cold compost pile.
The Carbon-to-Nitrogen Ratio
This is the one piece of composting science that actually matters in practice. Every material you add to the compost is either high in carbon or high in nitrogen. The ratio between them determines how quickly and cleanly the pile breaks down.
Carbon materials (browns)
These are dry, woody, or fibrous materials. They provide energy for the microorganisms that break down the pile. Think of them as the fuel.
- Dry leaves
- Straw or hay
- Shredded cardboard (not glossy)
- Newspaper (shredded)
- Woody prunings (chopped small)
- Sawdust (untreated timber only)
- Sugar cane mulch
- Dried grass clippings
- Egg cartons
Nitrogen materials (greens)
These are fresh, moist, and often smelly materials. They provide protein for the microorganisms. Think of them as the food.
- Vegetable and fruit scraps
- Fresh grass clippings
- Coffee grounds and tea bags (remove staples)
- Fresh garden prunings (soft, green growth)
- Chicken or animal manure (herbivores only)
- Seaweed (rinsed to remove salt)
- Hair and nail clippings
- Fresh weeds (that have not gone to seed)
The ideal ratio
The ideal carbon-to-nitrogen ratio for composting is roughly 25 to 30 parts carbon for every 1 part nitrogen (25:1 to 30:1). In practice, you do not need to measure this precisely. A rough guide is to add 2 to 3 handfuls of brown material for every handful of green material. If the pile smells, add more browns. If it is not breaking down, add more greens.
What to Add to Your Compost
Yes, add these
- All vegetable and fruit scraps (including citrus peels, avocado skins, banana peels)
- Coffee grounds and used tea leaves
- Eggshells (crushed)
- Dry leaves, straw, and hay
- Shredded paper, cardboard, and egg cartons (non-glossy)
- Fresh grass clippings (mix with browns to prevent matting)
- Garden prunings (chopped small)
- Herbs and flowers (spent or dead)
- Vacuum cleaner dust (from natural fibre carpets)
- Hair and pet fur
- Wood ash (small amounts)
- Manure from chickens, horses, cows, rabbits, and sheep
No, avoid these
- Meat, fish, and bones (attract rats and other pests)
- Dairy products (attract pests and create odour)
- Cooked food (attracts pests)
- Bread and baked goods (attract pests)
- Oils, fats, and grease
- Dog and cat droppings (contain pathogens harmful to humans)
- Diseased plants (cold compost does not kill diseases)
- Weeds that have gone to seed (cold compost does not kill seeds)
- Glossy or coated paper and magazines
- Treated timber, painted wood, or MDF sawdust
- Synthetic materials (plastic, nylon, polyester)
- Nappies (even "biodegradable" ones)
Choosing a Compost System
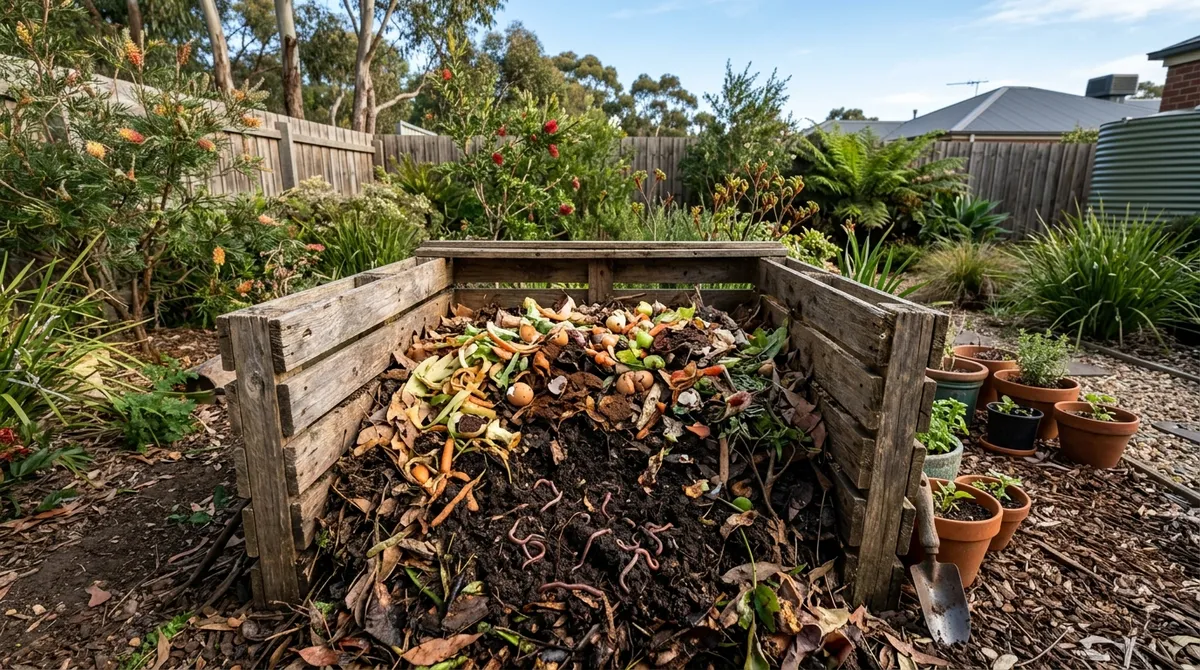
Open pile
The simplest option. Just a heap of material in a corner of the garden. No container needed. Works well for large gardens with plenty of material. The downsides are that it can look messy, it is slower to heat up, and it may attract pests if not managed properly.
Compost bin (enclosed)
Plastic or timber bins with a lid and no bottom. Available from hardware stores, garden centres, and many local councils (often subsidised). The lid keeps rain out and pests at bay. The open bottom lets worms and microorganisms enter from the soil. The most popular option for suburban gardens. Capacities range from 200 to 400 litres.
Tumbler
A sealed drum on a frame that you rotate by hand. Turning is easy (spin the drum) and the sealed design keeps pests out. Tumblers heat up faster than bins because they are insulated. The downside is limited capacity and the need to batch your compost (fill it up, let it process, then empty and start again). They are more expensive than bins.
Three-bay system
Three bins or bays side by side, usually made from timber pallets or wire mesh. Bay 1 is the active pile (adding new material). Bay 2 is the maturing pile (turned from bay 1 and left to finish). Bay 3 holds finished compost ready to use. This is the most efficient system for serious composters with large gardens. It requires the most space.
Worm farm
A tiered container system where composting worms (red wrigglers, not regular garden earthworms) eat kitchen scraps and produce vermicast (worm castings) and liquid fertiliser. Worm farms are compact, odourless when managed correctly, and perfect for small gardens, balconies, and apartments. They do not process garden waste or large volumes, but the vermicast they produce is the highest quality compost you can make at home.
Bokashi
A Japanese fermentation method using a sealed bucket and inoculated bran. You add all food waste (including meat and dairy, which regular compost cannot handle) and sprinkle bokashi bran over each layer. The sealed bucket ferments the waste anaerobically over 2 to 3 weeks. The pre-composted material is then buried in soil or added to a compost bin where it breaks down rapidly. Bokashi works indoors and handles a wider range of waste than any other method.
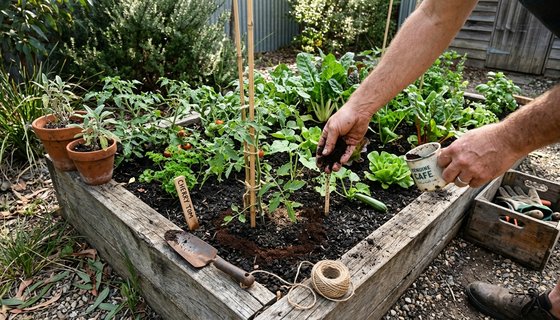
Building Your First Compost Pile
For hot composting, follow these steps. For cold composting, add materials as you have them and skip the temperature monitoring.
- Choose a spot in a shady or semi-shady part of the garden. Direct sun dries the pile out quickly in Australian summers. Place the pile or bin directly on soil (not concrete) so worms and microorganisms can enter from below.
- Start with a layer of coarse browns (sticks, woody prunings) about 15 cm deep. This creates airflow at the base.
- Add a layer of greens (kitchen scraps, fresh grass clippings) about 10 cm deep.
- Add a layer of browns (dry leaves, shredded cardboard) about 10 cm deep.
- Continue alternating greens and browns until the pile is at least 1 cubic metre for hot composting.
- Water each layer as you build. The pile should be moist throughout, like a wrung-out sponge. Not dripping wet.
- Cover the top with a thick layer of browns or a piece of old carpet to retain moisture and heat.
Managing Your Compost
Turning
Turning introduces oxygen, which the microorganisms need to work efficiently. Use a garden fork or compost aerator. For hot composting, turn every 3 to 5 days. For cold composting, turn once a month or whenever you remember. Each turn moves material from the outside to the centre and restarts the heating process.
Moisture
The pile should always feel moist but not soggy. Squeeze a handful of material from the centre. It should feel like a wrung-out sponge. If water drips out, the pile is too wet. If it feels dry and crumbly, it needs water. In Australian summers, you may need to water the pile weekly to prevent it from drying out.
Temperature (hot composting)
A hot compost pile should reach 55 to 65 degrees Celsius within 3 to 7 days of building. Use a long-stemmed compost thermometer (available from garden stores for about $20) to monitor temperature. When the temperature drops below 45 degrees, turn the pile. It should reheat within 24 hours. After several turns, the temperature will stop rising, which means the compost is nearly finished.
Troubleshooting Common Problems
The pile smells bad (rotten or ammonia odour)
Too much nitrogen (greens) and not enough carbon (browns). The pile has gone anaerobic (lacking oxygen). Add dry carbon materials: straw, shredded cardboard, dry leaves. Turn the pile thoroughly to introduce air. The smell should improve within 2 to 3 days. Going forward, add more browns with every batch of kitchen scraps.
The pile is not breaking down
Usually caused by too much carbon and not enough nitrogen, or by the pile being too dry. Add fresh green material (grass clippings, kitchen scraps, manure) and water the pile. Turn it to mix everything together. A compost accelerator (available from garden stores) can also kick-start a sluggish pile.
The pile is too wet and slimy
Caused by too much green material, poor drainage, or heavy rain getting in. Add large amounts of dry carbon material and mix it in thoroughly. If rain is the problem, cover the pile with a tarp or lid. Elevate the base of the bin on bricks to improve drainage.
Ants in the compost
Ants move into compost that is too dry. Water the pile thoroughly and turn it. The ants will leave as moisture levels increase. Ants are not harmful to the composting process, but they are a sign that the pile needs more water.
Rats and mice
Attracted by food scraps, especially cooked food, bread, and grains. Use an enclosed bin with a secure lid. Do not add meat, dairy, or cooked food. Bury fresh kitchen scraps under a thick layer of browns so they are not exposed. If rats are persistent, switch to a tumbler or bokashi system.
Flies and maggots
Common in summer. Black soldier fly larvae are actually beneficial decomposers, but they can be off-putting. Fruit flies are a nuisance. Cover fresh food scraps with a thick layer of browns immediately after adding them. Keep the lid closed. A layer of shredded newspaper on top helps.
Worm Farms: Composting in Small Spaces
Worm farms are the best composting system for small gardens, courtyard houses, and apartments. They are compact, clean, and produce two useful products: vermicast (worm castings) and liquid worm wee (leachate).
Setting up a worm farm
- Buy a worm farm kit (tiered systems like the Worm Cafe or Can-O-Worms are the most popular) or build one from stacking containers with drilled drainage holes.
- Add bedding to the first tray: shredded newspaper, coconut coir, or aged compost. Dampen it to sponge consistency.
- Add your worms. Buy composting worms (red wrigglers, Eisenia fetida) from a garden centre or online. Start with 500 to 1,000 worms. Do not use regular garden earthworms because they will not survive in a worm farm.
- Start feeding after a few days. Add small amounts of food scraps (a couple of handfuls). Increase gradually as the worm population grows.
What worms eat
- Vegetable and fruit scraps (chopped small)
- Coffee grounds and tea leaves
- Crushed eggshells (provides grit and calcium)
- Small amounts of shredded paper and cardboard
- Avoid: citrus, onion, garlic, chilli, meat, dairy, oily food, and bread
Placement
Keep the worm farm in a cool, shady spot. Direct sun in Australian summers will cook the worms. A south-facing wall, under a tree, or in a garage or carport are good locations. In winter, move the farm to a warmer spot if temperatures drop below 10 degrees regularly. Worms are most active between 18 and 25 degrees.
Harvesting vermicast
When a tray is full of dark, crumbly vermicast and the worms have migrated to the upper tray, the bottom tray is ready to harvest. Remove it, spread the vermicast in the garden, and place the empty tray on top to start the cycle again.
Using worm wee
The liquid that collects in the bottom of the worm farm is a potent liquid fertiliser. Dilute it 1:10 with water (1 part worm wee to 10 parts water) and use it to water plants. Apply every 2 to 4 weeks. Undiluted worm wee is too strong and can burn plant roots.
Using Finished Compost
Finished compost is dark brown to black, crumbly, and smells like earth. You should not be able to identify any of the original materials. It is ready when it has cooled down (if hot composted) and has an even, soil-like texture.
In the garden
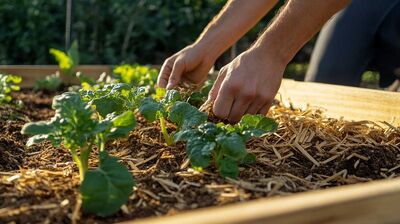
- Soil amendment: Dig 5 to 10 cm of compost into garden beds before planting. This improves soil structure, water retention, and nutrient content. It is the single best thing you can do for any garden bed.
- Mulch: Spread a 5 cm layer of compost on the surface around established plants. It breaks down slowly and feeds the soil over months.
- Planting mix: Mix finished compost with garden soil and sand in equal parts for a nutrient-rich planting mix for pots and raised beds.
- Top dressing for lawns: Spread a thin layer (1 to 2 cm) of fine compost over the lawn in spring. Water it in. This feeds the grass and improves the soil underneath.
Compost tea
Steep a bucket of compost in water for 24 to 48 hours, stirring occasionally. Strain out the solids and use the liquid to water plants. Compost tea delivers soluble nutrients and beneficial microorganisms directly to plant roots. Apply every 2 to 4 weeks during the growing season.
Composting in Australian Climates
Hot, dry climates (inland areas, South Australia, Western NSW)
The main challenge is keeping the pile moist. Water the compost regularly in summer, especially during heatwaves. Place the bin in full shade. Consider a covered system (tumbler or bin with a lid) to reduce evaporation. The heat speeds up decomposition, which is an advantage.
Humid, subtropical climates (Brisbane, Northern NSW)
The main challenge is too much moisture and pest management. Use a bin with good drainage. Raise the bin on bricks to prevent waterlogging. Watch for cockroaches and rats in warm, wet conditions. Cover the pile or close the lid to keep rain out.
Cool, temperate climates (Melbourne, Hobart, Canberra)
Composting slows down in winter as temperatures drop. Hot composting works year-round if you maintain the pile. Cold composting piles may take 12 months or longer in cool climates. Place the bin in a sunny spot to capture winter warmth. Insulate the bin with old carpet or hessian in the coldest months.
Track Your Garden Composting
Planting Season helps you plan what to grow and when to feed with your homemade compost.
Open the App →Frequently Asked Questions
How long does compost take to be ready?
Hot composting produces finished compost in 6 to 8 weeks if managed actively (turning every few days, maintaining moisture and the correct carbon-to-nitrogen ratio). Cold composting takes 6 to 12 months with minimal effort. Worm farms produce vermicast continuously and a tray is usually ready to harvest every 2 to 3 months.
What should you not put in compost?
Do not add meat, fish, dairy, cooked food, bread, oils or fats, pet droppings (dog or cat), diseased plants, weeds that have gone to seed, glossy or coated paper, treated timber, or synthetic materials. These items attract pests, create odours, or introduce pathogens. Citrus peels and onion skins are fine in compost bins but should be avoided in worm farms.
Why does my compost smell bad?
Smelly compost is almost always caused by too much nitrogen (green material) and not enough carbon (brown material), or by the pile being too wet and lacking oxygen. Add dry carbon materials like straw, shredded cardboard, or dry leaves. Turn the pile to introduce air. The smell should improve within a few days.
Can you compost in a small garden or apartment?
Yes. A worm farm is the best option for small spaces and apartments. It fits on a balcony, produces no odour when managed correctly, and processes kitchen scraps into nutrient-rich vermicast and liquid fertiliser. Bokashi bins are another compact option that ferments food waste indoors before it is buried in soil or added to a compost bin.